Some of the things I need to do is to replace the power supply in my BBC
Micro, replace caps and install a CF card on an Amiga 600, fix some cables,
play some PET games, take on some of the tasks I haven't finished in previous
challenges and so on.
- June 29, 11:00 (GMT+2)
Challenge set up.
- July 1, 21:10 (GMT+2)
-
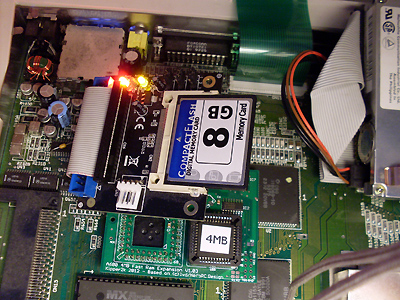
Starting off with something "simple", installing a CF drive
into a borrowed Amiga 600. The original 40 MB HDD is fine,
but due to installing a Vampire 4 MB internal memory
expansion which clips onto the CPU, the IDE drive would no longer fit.
Unfortunately my 2.5" IDE cable is a bit on the short side, and has one
pin blocked, so I had to carefully bend away that corresponding pin on the CF
adapter card. I will also need an amount of isolation tape between the CF
adapter and the memory expansion once I assemble it properly, to prevent any
form of short circuit.
At first HDToolBox didn't seem to detect the card, so I had a look on the
Internet for solutions, when I remembered that one needs to manually read
drive parameters from the drive in order to use it. While the maximum partition
size on the Amiga with FastFileSystem is 4 GB, it
amazingly seems to have auto partitioned the 8 GB card
into two 4 GB partitions.
Too bad the Workbench 3.0 boot disk I've used doesn't seem to have all the
programs installed on it, so I haven't been able to format the
CF drive yet, only partitioned it. Fortunately I have a fully fitted out Amiga
1200 with PCMCIA-CF and so on, so I'll be able to create the boot floppies
required to install the system on the card, once I get to it.
- July 1, 22:50 (GMT+2)
DUMBASS! Here I've got an Amiga 600 with 2.0 ROMs and
Kickstart 37.350, which I'm booting with a Workbench 3.0 disk. It is amazing it
actually boots, and not so strange that applications like SYS:Format fail, since
I'm trying to run a program written for a newer OS version than the one in the
computer!
Oh well, it means I should download install floppies for WB 2.04, 2.05 or
possibly 2.1 and use, then I'll probably be able to install the system as well.
Actually all the time I was thinking Amiga 1200 but this is a 600.
- July 1, 23:55 (GMT+2)
After a failed Google search that only yielded me a strange
downloadable Windows executable that I refused to open, I realized a friend of
mine got a FTP site with all sorts of files, which is also where I found a good
set of floppy disk images. After sacrificing some chess game, I now have the
full set of install media, and the format command is almost 1% done when it
comes to formatting a 4 GB partition... guess this one
would have to run all night to finish.
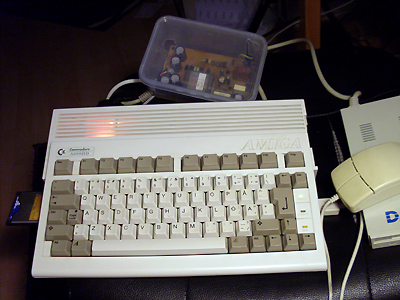
Besides putting everything into place and eventually replace the caps for
the somewhat malfunctioning sound, I also need to troubleshoot why the Return
key doesn't register when all others do. I already tried to reseat the ribbon
cable, I suppose the fault might be more complex.
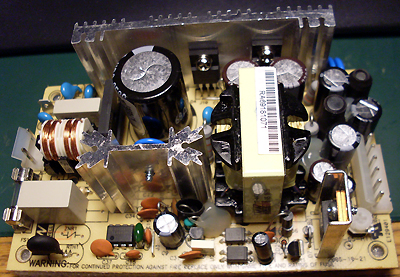
I also need to do something pretty about the make-shift power supply, which
is the same unit as I was playing with in 2012 but
now placed in a clear plastic container and mains wires running on the outside
of that one.
- July 2, 08:30 (GMT+2)
Gah.. all night was not long enough. I had to leave for work
with about 1.5 hours left to go so I had to cancel the process running all
night.
Last time when I formatted a 2 GB HDD it took about
an hour, but perhaps addressing the CF memory is slower. Actually I might
repartition the card into smaller chunks, although I don't know how many
partitions on a single drive are supported in Amiga OS, probably CFD0 - CFD9
or whatever the device is called.
- July 2, 20:10 (GMT+2)
I repartitioned the drive into three:
1 GB system, 3 GB work and
3 GB games/spare. Then I ran the script supplied on the
2.0Install disk, and it would format the first two partitions in a few seconds.
The whole system install process took about a half hour including a sandwich
break.
It made me curious what is the difference, and found that the FormatHD script
formats default named partitions with the quick parameter, which reduces
format time from 8 hours to perhaps 15 seconds! :-O Now I understand there may
be situations where it is not applicable, but I could have saved several hours
through life if I had known before!
- July 2, 23:25 (GMT+2)
-
My next goal with this computer was to install a Compact Flash
to PCMCIA adapter, as well as the FAT95 file system so I can transfer files
directly from a PC.
The installation of FAT95 is rather automatic and straightforward, just
click on the icon. The biggest part is to get the L:fat95 file in its position.
To install the compactflash.device, you should copy the file to the DEVS:
folder and double click on the DOS driver for CF0, but when using Kickstart 2.05
on an Amiga 600, the latter causes a Guru meditation. This older version of the
OS uses a file called Mountlist, also in DEVS: which I needed to edit manually.
Fortunately the syntax seems to be the same as for newer DOS drivers.
Finally you need to MOUNT the new device CF0 which can be done in the
S:Startup-Sequence, but even after doing that, the CF device icon doesn't
appear in Workbench until I start a CLI and manually try to access CF0: upon
which at first I get an error message, but on second attempt it can be reached
and the icon shows up on Workbench.
Note that with Kickstart 2.1 or newer (Amiga 1200 has KS3.0 and upwards),
the process is much simpler as the DOS driver supplied with the installation
will work right away. I found a lot of discussion threads about this, but none
was entirely clear, and just about everybody assume that you use an Amiga with
PCMCIA slot, it is an Amiga 1200 - the remaining 600 users seem so few that
they're forgotten.
- July 3, 23:35 (GMT+2)
Not much to report. I got home after a hot day at work, and
was too tired to do anything on the retro front. Well, except for assessing the
damage caused by a short circuit from the power supply late last night.
It turns out the Amiga 600 seemingly was unharmed, while my 14" TV got
some minor fault, perhaps with ground. It manifests as sound from the last TV
channel can be heard in the background while using composite or RGB input, and
there is a bit of noise on the image too. When checking with another TV, the
picture and sound is perfectly fine from the Amiga, which is good since TV's
are disposable while vintage computers are not so much.
- July 4, 23:55 (GMT+2)
-
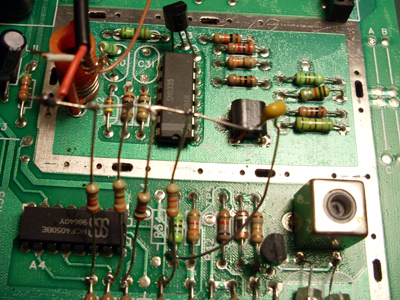
Today I borrowed an Atari 2600jr in order to modify it for
composite video output. There are tons of different mods for the Atari 2600
series, and supposedly the Junior model should be among the easiest to modify
with good results. Instead of tapping the TIA directly, there is a CD4050 chip
which stabilizes the signal.
I followed the guideline by Brighty83, but I found that I was short of
100 pF capacitors, so I temporarily installed a
100 nF capacitor, i.e. 1000 times as much capacity.
Obviously once I finalize the mod, I will need to trim wires, insulate and
all other means so I can reinstall the metal shielding on top of it, but right
now it is a bit of a test to see if it is useful at all.
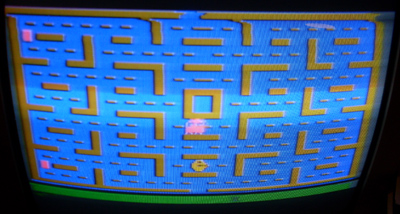
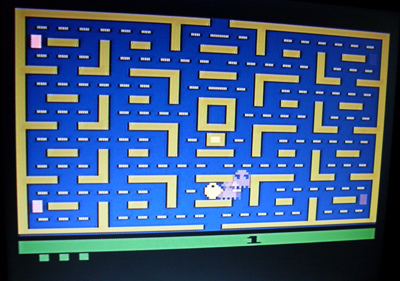
At first, I got no video at all so I thought I had botched it or made an
error, but after a bit of fiddling, I got Pac-Man to display.
As you might see from the small image, the upper part of the display is
wobbly, and the score display on the bottom is nearly unreadable, but otherwise
it looked much better than I had expected.
I will probably try to get a capacitor of the right value and see if it gets
better. Once I'm satisfied, I will also wire up the audio and make it pretty.
- July 10, 11:35 (GMT+2)
-
Where did the past week go? Not much happening here at the
moment. I have begun programming in IntyBASIC for the Intellivision video game,
as there is an IntyBASIC programming contest going on at
the AtariAge forums.
My game Alligator Swamp is planned to be a variant of a somewhat
unknown Dutch game called Alligator Moeras for the Commodore PET,
crudely ported to the C64. I have already got lot of ideas for improvements
to the original game, ranging from better graphics, vertical scrolling trees,
different fruits to night mode and even snow level which is a running gag in
Intellivision circles.
Since the programming contest runs much longer than the RetroChallenge does,
I might still be working on the game after the RC has ended. Hopefully I'll
return to some of the other projects next week too.
- July 21, 23:40 (GMT+2)
As usual, real life takes over after getting a bit into the
challenge. In my case, I could blame it on waiting for some capacitors to show
up, but as I've got plenty of other things to take on before the envelope
arrives, it is a lame excuse.
In the past few days, I busied myself on my spare time writing an Emacs Lisp
mode for the above mentioned BASIC programming. It is starting to shape up well,
with built in support for invoking the compiler with customizable settings. I
will add a list of built-in keywords for syntax highlighting too, just because
it is fun to do. In the mean time, I teached myself a fair bit about Emacs Lisp
that I either had forgotten or never knew, although my code looks horrible
compared to what a seasoned, trained Lisp programmer would output.
Perhaps I'll have a go about some hardware later on this week.
- July 23, 23:40 (GMT+2)
-
Oh, the irony! I placed an order for those caps from Futurlec
on July 15. Obviously it hasn't arrived yet since there is a long distance
between Thailand and Sweden, and I chose the cheapest type of shipping.
Now I started to look at those Mean Well PT-65 power supplies I bought
earlier this year and plan to use one of them to replace a broken PSU in a
BBC Micro. Of course they're designed to use Molex connectors of the type
5194/5195 with a spacing of 3.96 mm = 0.156" of which I don't have it at
home and no local shop is selling it as well. I should've ordered those either
from Elfa when I bought the power supplies, or from Futurlec with my latest
order, if I had bothered to look at the datasheet first.
Of course as a desperate measure I could solder wires directly to the pins,
but I'm not that much in a hurry even though the RetroChallenge is on its way
to end, so I think I'll buy the connectors from somewhere and splice on the
original wires on the connector.
- July 25, 02:00 (GMT+2)
Tonight I have written a floppy disk full of Commodore PET
games. I am aware that floppy disks written on a 1541 at best are readable on
an IEEE drive like a 2040, 3040, 4040, 2031 etc; due to different sync marks
the data would be screwed up if one wrote to the same disk from one of the PET
drives, but since I don't plan to do that, it'll be fine.
What was not fine though was the version of my ROM set. My machine is a
3032 with BASIC 4.0 with a factory made label on the front that says 4032,
but since it has the older type of motherboard and no 6545 CRTC, it is not a
"real" 4032, but a 3032 with upgraded ROMs. I believe those are a bit uncommon
in the PET world. In any case, it turned out several of the more advanced
games, those with parts of machine code, would lock up or crash on this
machine, often as expected since it is mentioned elsewhere they only work
on older PET machines.
My solution to this was of course to downgrade the computer! Hello Mr EPROM
burner and also Mrs EPROM eraser. Fortunately I got a small stash of 2532 chips
which are pin compatible with the 2332 ROMs without the need of an adapter,
and that the GQ-4X EPROM programmer actually can read and write to 2532 chips,
which is not too common. So after some erasing, programming and verifying, I
got the honor to open up the PET, lift the BASIC 4.0 ROMs and plop in the set
of BASIC 2.0 ROMs.
Voila! The *** COMMODORE *** prompt replaced by a ### COMMODORE ### prompt,
or if it is vice versa. At least all the games I tested now both load and
execute as they should. Perhaps one day I'll find that I need to re-upgrade
again, then I'll plop back in the newer ROM set.
It brings me to another small task to play with for the last few days of
the challenge, to make an Atari style joystick adapter for the PET and also
connect a speaker to get sound. Both go on the user port so it should be rather
easy to wire it up, perhaps I get to it in the weekend.
- July 27, 11:25 (GMT+2)
The weekend came and passed without any retro computing
activities. However I have looked up some userport diagrams on the PET FAQ
which I repost here for my own sake, so I have easier access to them later
on.
User port from the back:
                                     1  1  1
          1  2  3  4  5  6  7  8  9  0  1  2
          =  =  =  =  =  =  =  =  =  =  =  =
         ### ######################### ######
          =  =  =  =  =  =  =  =  =  =  =  =
          A  B  C  D  E  F  H  J  K  L  M  N
          |     |  |  |  |  |  |  |  |  |  |
          |     |  |  |  |  |  |  |  |  |  |               .--------.
port 1->  8     1  2  3  4  |  |  |  |  |  +---------------|        |
                            |  |  |  |  |  |               | Audio  |
                 port 2->   1  2  3  4  |  8               | Ampli- |
                                        |                  | fier   |
                                        +--- /\/\/\ -------|        |
                                          50-500K resistor `--------'

Joystick pin diagram =>  5  [4] [3] [2] [1]
looking at back of                    \ /
male connector             9  [8]  7  [6]
The fire button (pin 6) should be connected by adding diodes from joystick
pins 1 and 2 on respective port and wire them together to pin 6 with the
banded end pointing to the fire button.
In theory it sounds relatively simple, now to see if I get it to work in
practise. I'm just a little unsure about what an audio amplifier means, if I
should connect a small (piezo) speaker directly to the source or if it will
be more like a line output to go to a real amplifier.
There is a more advanced diagram in the PET User Port Cookbook by Greg Yob
which instead involves +5V from the cassette port, a 47 ohm resitor, a 100 ohm
potentiometer, an 8 ohm speaker and a NPN transistor capable of sinking 200 mA.
I guess I may try the easier approach at first and see if I get anything out of
it and then a more complex design.
- August 3, 10:45 (GMT+2)
Oh, the challenge has finished! Too bad I never got anything
truly finished. Last week I ordered even more parts, and since I'm a stingy one
getting parts from far abroad to save money, not even the first shipment of
three has arrived yet.
I suppose I'll try to wrap up some of the loose ends and disassembled
computers lying around my apartment, possibly I will keep posting about the
progress here even though the RetroChallenge officially has ended.
- August 9, 20:00 (GMT+2)
-
True to my word, I'll keep this log running for a little longer.
My first Futurlec order arrived a few days ago, so I replaced the temporary
100 nF capacitor for the recommended 100 pF capacitor, and the composite video
image from the Atari 2600jr became very good.
Compared to previous picture, this one was taken on a TFT rather that CRT,
but it really was the capacitor change that made the differece.
I wouldn't say the image is excellent since there are slight moire patterns,
but not worse than you'd get from RF anyway.
Now it is just a matter of wiring this one up nicely, add sound and position
the sockets somewhere they fit.