- June 18, 13:30 (GMT+2)
Project defined and early preparations.
- July 1, 22:15 (GMT+2)
I decided to start off with something "easy", i.e. finishing
up the two home built MMC2IEC interfaces for Commodore computers. However it
turned out to not be as easy as I had expected.
To make a long story short, these interfaces utilize an Atmel ATMEGA644 or
ATMEGA1284. The bootloader code for sd2iec devices comes in Intel HEX format,
and my chips are of the old DIL variety. I have access to two different USB
powered programmers:
- MCU Mall GQ-4X only recognizes 644 chips in whatever other package than
DIL. This software can read the supplied HEX file but I can't program the
chips.
- Autoelectric MiniPro TL-866CS recognizes both 644 and 1284 chips in DIL-40,
but it refuses to recognize Intel HEX files which have a record of the less
common "03" variety, used to fuse execution address.
I can convert HEX to bin and load into the MiniPro, but it prevents me from
setting execution address. I tried none the less. The MMC2IEC powers on one of
its LED's, but never gets as far as searching on the SD card for full firmware
to automatically flash.
Perhaps I can download the bootloader sources and relocate to $0000, assuming
Atmel code is easy to relocate. Right now I don't see any option, as this
particular interface doesn't have any ICSP interface for inline programming.
Update: I tried to program the 1284 with the full firmware instead
of the bootloader. It would prevent me from having automatic firmware upgrades
in the future, but in the best of situations it would make it work right now.
Unfortunately this approach didn't make it work any better.
Tomorrow night I'll probably have a look at the Basis 108, my main target of
the challenge.
- July 2, 19:50 (GMT+2)
Stiff neck and busy with other things, so my RC event today
had to be kept short.
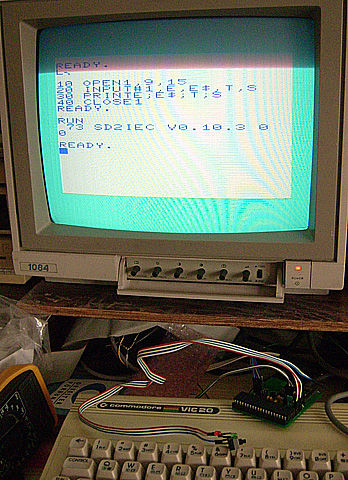
Thus I made one last attempt with the MMC2IEC, trying the universal
"read the error channel" approach to see if it is alive at all:
10 OPEN1,9,15
20 INPUT#1,E,E$,T,S
30 PRINTE;E$;T;S
40 CLOSE1
And yes it is alive! However when I try to read a directory, at best it
hangs and results in a listing full of garbage. I tried a VIC wedge with my
Megacart, and it gives the same result as the Basic program, except the
communication hangs before it should return to the READY prompt. I suppose the
problem somehow lies in how I programmed the ATMEGA, but I'll have to
trouble-shoot it for another day.
Besides, that is a perfectly normal VIC-20 second revision (cost reduced),
just that I swapped the worn out black keyboard for a good working white
keyboard from a spare/broken C64C. It might look odd, but it works just as
well as one would expect.
Tomorrow I'll be even more busy, so next planned update is not until
Wednesday night.
- July 4, 21:30 (GMT+2)
Not much done tonight, but at least I dismanted the German
battleship otherwise known as Basis 108.
Just like expected, I found the empty socket where joysticks connect. So my
next task will be to populate socket X9 with a homemade adapter to connect an
analog PC joystick.
I found two designs in the Apple FAQ, regular
joystick or joystick
with autofire. I believe the simpler design without autofire will be enough
for me. Capacitors are on their way, resistors probably already are in the
drawer, connectors and cabling are also ready.
As a bonus, I include two pictures of my Basis 108. The thumbnails are
clickable to get bigger resolution.
My Basis differs from most other machines one can find pictures of by that
it has two half-height 5.25" floppy drives on top of eachother and the
other full-height slot empty. Most other Basis 108's have two full-height
original Apple drives installed. From the picture on the
inside you also see how much space there is.
- July 5, 21:40 (GMT+2)
Tonight I brought out the soldering station!
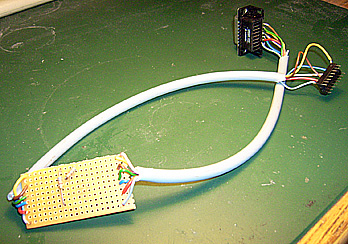
To start with, I had to measure that those blue, grey, brown resistors I
found in the surplus box really were 680 ohm. The cables to my multimeter have
been patched and kept falling apart, so my first soldering task was to put them
back together.
Once that was done, it was time to find some cabling with enough wires, trim
the ends and solder to a small spare board. Since most signals are meant to be
passed through, I chose a board with continuous copper traces. My capacitors
have not yet arrived, but at least I got to solder the two resistors in place.
One of the soldering tasks I like the least is to solder wires onto
connectors. In this case, I had a female DB15 (unfortunately meant for board
mount) and a DIP-16 socket in the other end. The socket was easier to solder,
although I must admit I haven't yet checked continuity from the pin to the
board.
I made a test mount inside the Basis. This construction will fit, although
the DB15 part of the cable will hang out through one of the empty DB25 holes.
Perhaps the mount can be improved by somehow fastening the DB15 or even go as
far as use a different, regular type of connector. Since I don't have the caps
in place yet, I haven't powered it on.
- July 10, 22:30 (GMT+2)
After four days of doing nothing (or having other things to
do), I soldered in the capacitors tonight.
It was a partial success. I tried two games and two different analog PC
joysticks. One joystick reacts to up/down and sometimes fire. The other only
reacts to up/down. I will have to run a test program to see exactly how well
they work, and probably plug in either joystick to a PC to verify that it
should work at all.
In the mean time, I have some other programming projects going on. More
about those later on, although they'd be diversions from my main RC targets.
- July 12, 23:45 (GMT+2)
Tonight I triple checked the DIP-16 pinout and then typed
in this very simple Apple Basic test program:
10 PRINT"X: ";PDL(0);" Y: ";PDL(1);

15 PRINT" B1: ";PEEK(-16287);

17 PRINT" B2: ";PEEK(-16286)

20 GOTO 10
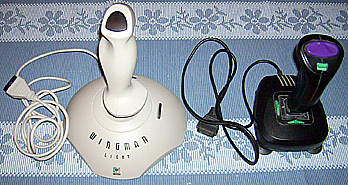
I tried both joysticks, and came up with these results:
- The Logitech Wingman Light (to the left) actually works 100% when it
comes to left-right and up-down. It centers fairly well to the middle of the
value range. However neither of the buttons register.
- The no-name black arcade joystick (to the right) is stuck to the extreme
left. At best I can make it register a little bit of right movement. Up/down
is quite OK, although it doesn't center very well. However the two buttons
register in a pulsating pattern as long as autofire is disabled (or perhaps
enabled, I don't understand what "ON" and "OFF" means as printed on the toggle
button).
That means I actually have two analog PC joysticks that both have one or
more issues, but the combined tests show the adapter circuit and reading the
joysticks actually works! Now I need to find some cheap PC joystick on which
both X and Y axises work as well as at least one or ideally both buttons.
I understand those PC gamepads, of which I've got three, won't work since
they utilize digital mode on the PC, while I'm strictly looking for analog
action.
- July 14, 17:30 (GMT+2)
As a brief interlude, I brought out the PCB from an
Amiga 500 power supply I bought off eBay for £1 a while ago.
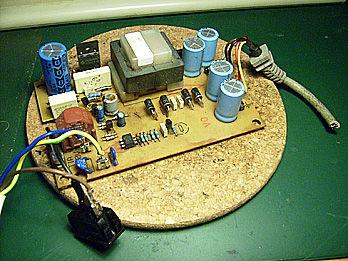
The idea was to see if it (1) works and (2) can be adapted for other uses.
In theory it should output +5V @ 2.5 - 4.5A,
+12V @ 1.0A and -12V @ 0.1A.
In practise I get an alarming ticking noise, which I think is a sign of
potential failure, so I'll probably dump the board and rather get some other
cheap power supply that I can trust. I didn't even bother to measure the output
voltages.
Update 19:00: I got curious, and measured the outputs anyway. They
seem to be +5.25V, +13.80V and -13.80V without load. That is probably within
spec for a supply that is rated at 5V + 12V at use. The ticking noise still
makes me careful though.
Update 20:45: So I ordered a set of 1x 47uF + 5x 4700 uF caps from
eBay. That is $4.38 including shipping, and perhaps can be worth the money if
it makes me certain the board can work (inside a proper casing of course).
- July 19, 00:10 (GMT+2)
Very little done on the challenge. I played a little with
6502 machine code the other day, and last night I fastened the DB15 joystick
port to an unused slot on my Basis.
In the mean time, I have ordered parts to a brand new PC, but that is rather
outside the scope of this challenge. Or maybe it isn't, as I'm planning to
reuse an empty Commodore 8050 floppy drive case for the PC. It might not be
built during July, but I might keep using this page for a build update even
past the Retrochallenge.
- July 25, 23:25 (GMT+2)
Still waiting for a few power supply caps. A spare PC
joystick for the A2 adapter arrived today, will test it tomorrow.
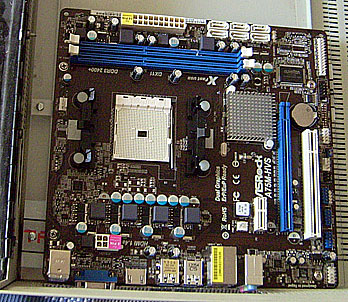
When it comes to the new PC, most parts have arrived. I have temporarily
fitted the board inside the case, and so far it looks good. I haven't decided
which kind of power supply to use or how to secure it, but that will be solved
in the next couple of days.
For those interested in seeing more pictures, you can
find an
album here with brief comments in Swedish.
When it comes to more Retrochallenge related events, I should investigate
the RS232 on the Basis as well as having a go about backing up the Corvus drive.
I'm also doing some programming, but nothing so far to publish on this log.
I'll see how much more action I'm getting out of the challenge, but will
likely finish it up at the end of July or beginning of August even though that
is past the challenge deadline.
- July 26, 10:00 (GMT+2)
The new PC joystick works fine, except for fire buttons still
operate in a pulsating on-off pattern with autofire in one position, and nothing
at all in the other position. Perhaps I ought to adapt the circuit according to
the slightly more complex autofire solution? Or get yet another PC joystick
that doesn't have any autofire functionality at all, of course.
- July 30, 21:45 (GMT+2)
New caps arrived today!
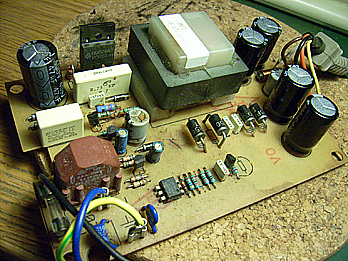
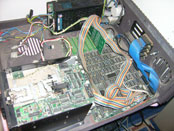
I replaced the five big ones, and discovered the board has another four
smaller electrolytes, not to mention all the other components.
 Too bad I didn't order replacements for all
of them at the same time!
However, I'm still getting the ticking sound, and it appears to origin from
the big grey part with a transparent top... well, is that a transformer? In any
case, all real Amiga people are moving away from the original PSU's and use
better quality PC AT/ATX supplies, and it might be a sign it is on the end of
its life, new caps or not. Thus I suppose I shouldn't bother more about it,
perhaps use as a 5V + 12V source for less critical applications but then I need
to place it in some protective box anyway.
One more day of the challenge, and I'm back at work which means I get home
later in the evening and have other things to do, so I suppose I'll update this
page whenever I have time (past the challenge deadline) just to wrap whatever
is left to wrap up. The "AMD 8050 PC" build will of course
happen during August, but perhaps I'll stick with updating the photo gallery on
that one.
In any case, the Retrochallenge 2012 has been a fun event, and my attention
lasted much longer than it did in the Winter Warmup 2010. Perhaps if I'm doing
a bit of preparation and planning, I can enter again next time around with one
or more coherent projects, even something involving "research".



 Too bad I didn't order replacements for all
of them at the same time!